
· Daniel Oldberg · Smart Home · 11 min read
Smartifying old heat pump and reduce electricity costs
Preparing for a cold winter and higher energy costs by smartifying my 14 year old geothermal heat pump. Check out my blog if you're interested in reading on how I try to reduce my energy bills this winter using Arduino, some code and electricity spot pricing.

Introduction
In hard times comes many difficulties. One us Europeans are facing today is the energy crisis. Cost of energy has drastically increased. In my country, Sweden, we’ve been blessed with low energy prices which benefits us greatly as using electricity is crucial for our heating houses, mostly using different kinds of heat pumps and direct heating. Since the energy crisis in Europe, this has now changed and we’re moving into a cold winter where temperatures normally drop to below -10 degrees and electricity prices are expected to increase up to 10 times the normal rate.
Are we doomed?
Yes.
Kidding aside, what can we actually do?
Here are three basic things that I’ve been doing:
- Look up my electricity provider and compare against the competition. This will of course vary depending on your location. In Sweden, you can purchase electricity from numerous vendors, i.e. open market, all with different pricing options such as:
- fixed (well, you used to be able to buy these)
- dynamic (ever changing according to electricity company’s own calculations, normally a cost / kWh based on all their customers usage) and then my personal favorite:
- spot hourly pricing. I use Tibber. - Get Tibber here (shameless referral link) This article will focus on the latter where you would be personally able to respond to the market set pricing and set usage accordingly to get a vast lower cost than the other alternatives.
- Get data to make smart decisions. This doesn’t have to be anything fancy, a wall power meter will suffice to monitor the usage on devices. The number that you’d be interested in is either the amount of Watts that a unit is driving or just measuring the kWh over a certain amount of time. A thousand watts (1000W) that is being run for one hour is equal to 1 kWh (Kilowatt-hour) which can then be compared against the current spot price. 2000 Watts for 30 minutes would be the same 1kWh. Having data lets your do smart decisions. A turned off TV drawing 10 Watts would draw 0,01 kWh which is 7,2kWh per month or 86,4kWh a year. Any investment in trying to solve this would probably never give a good return of investment. A 6000 Watt heater though, that’s another story.
- Once we have data to look at, then we try to find solutions to try to address the issues. How I normally do this is different depending on use case. In some cases, things that we run are just old and inefficient, which can be replaced by something modern and more energy efficient. One case might be an old dryer for clothes where newer ones might run a heat exchange to not let out hot air, thereby reducing energy consumption. Then we can look into how we can control items. I run a ZigBee network connected to my Home Assistant instance where I can use things like simple [Ikea smart wall outlets] to easily turn on and off stuff depending on time schedules, etc. I’m also running quite a few Arduino ESP8266 using [ESPHome] where I can be more flexible and cost effective to implement my own logic.
Now we can use the above recipe on my particular problem.
1. My power provider
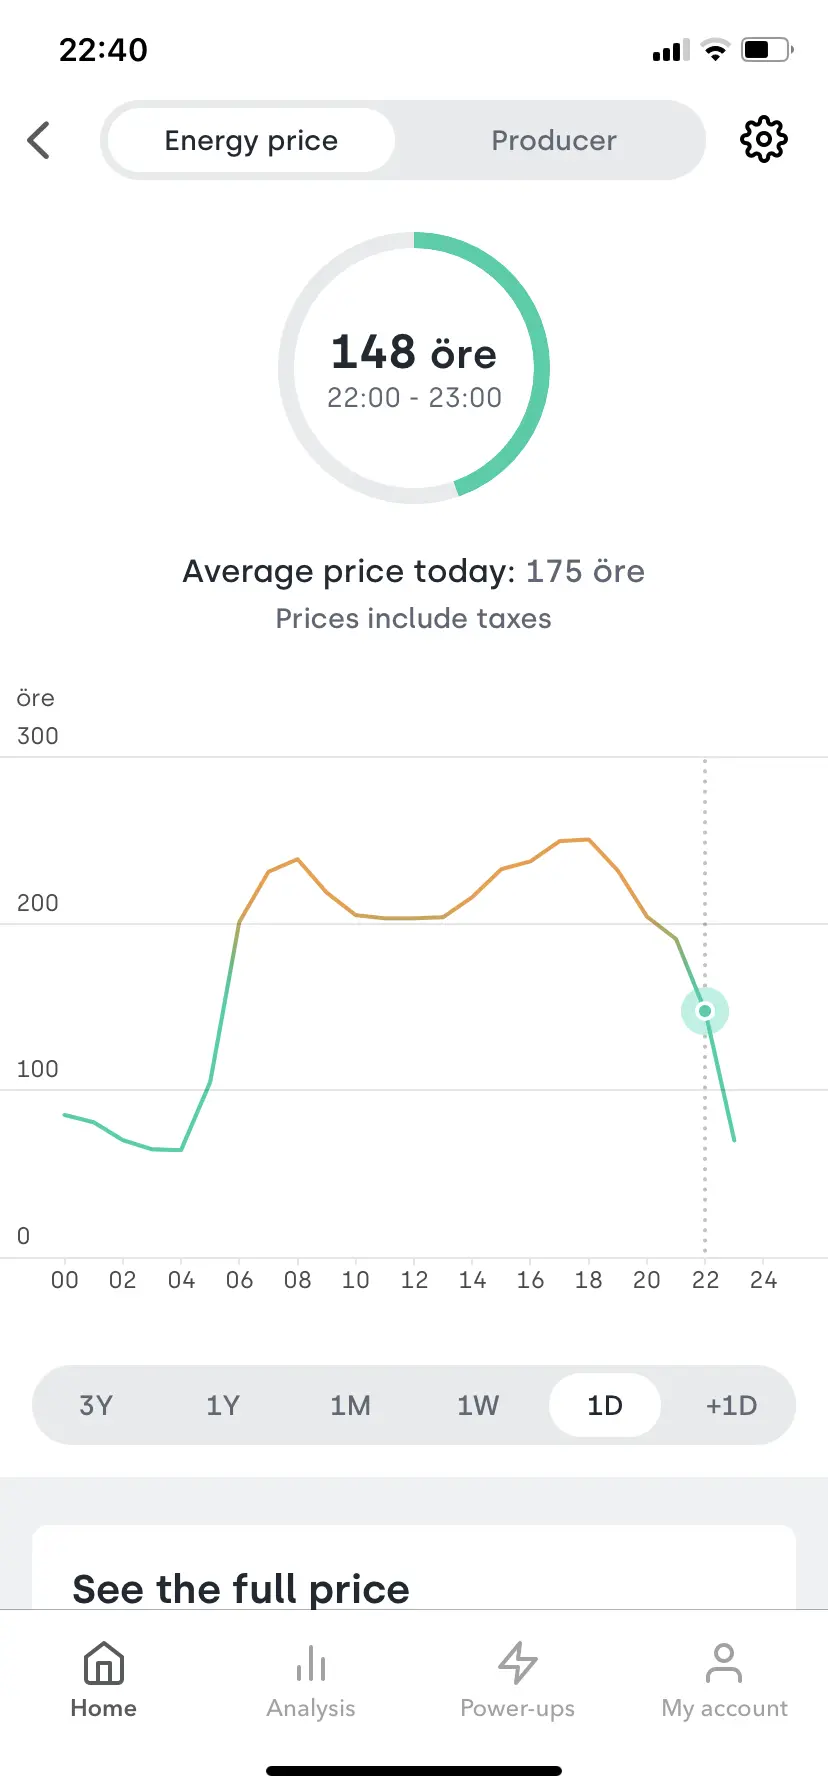
Like I said, I use Tibber and I think it’s great. I get hourly Nordpool spot pricing and I can get the current and next day’s pricing. I can charge our electric vehicles during the nights when prices are low, but spot pricing does introduce some slight inconvenience. Such as when adjusting daily rutines such as showering to late evenings.
2. Data
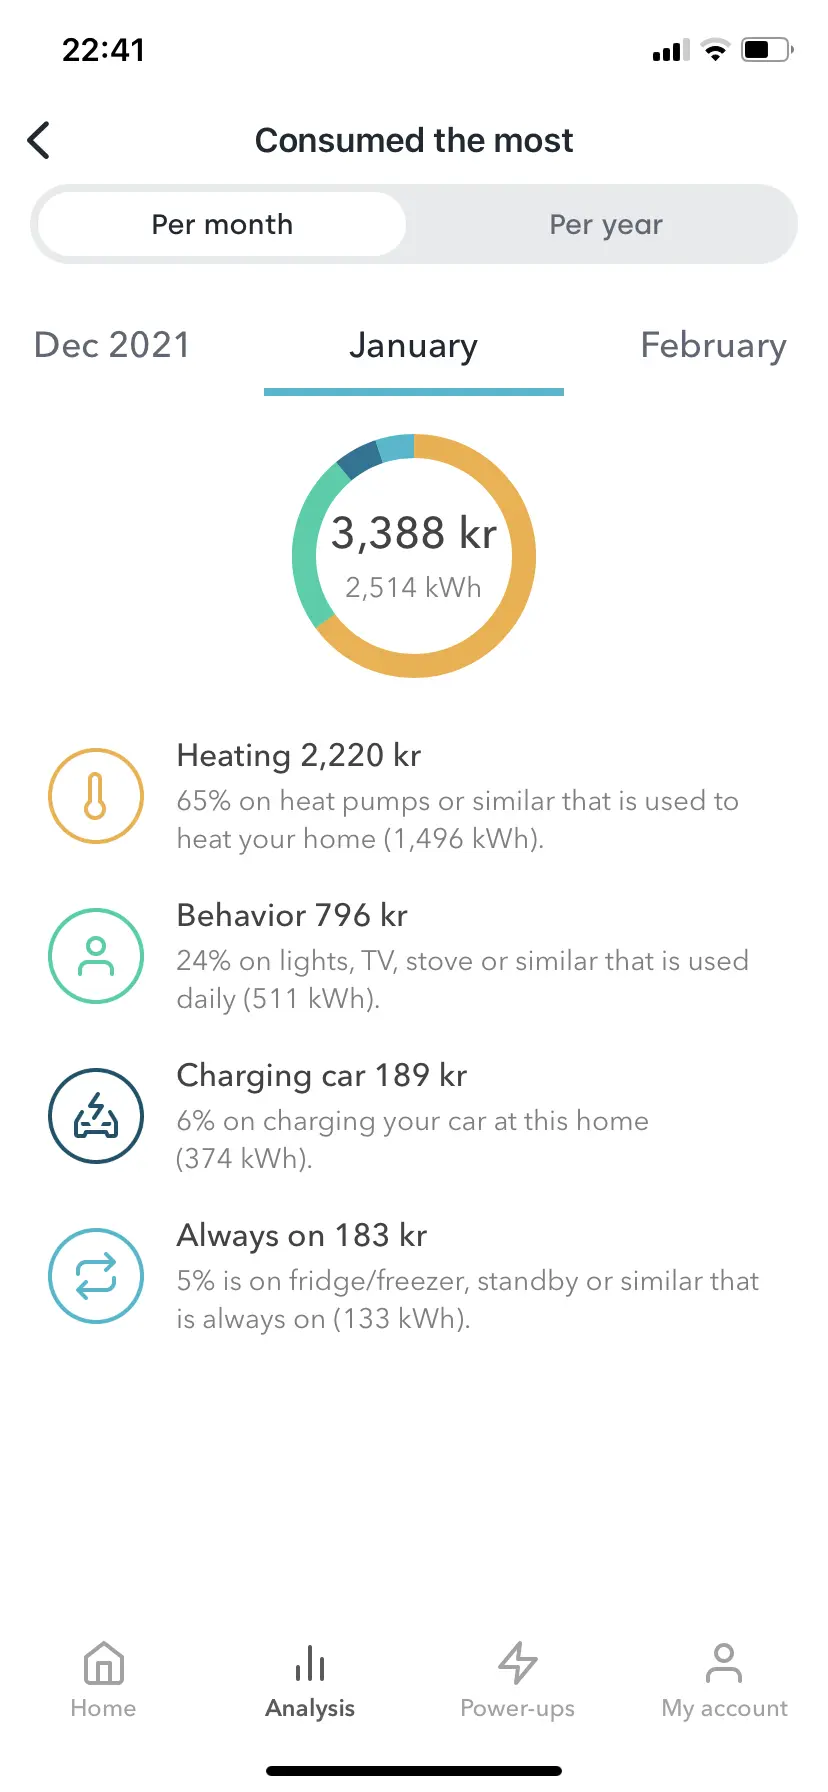
This is my consumtion last January 2021 according to the Tibber application. As clearly displayed in the graph, my biggest electricity usage is by my heating system. This gives me a good indication that there could be potential savings. I’m thinking - What if I can put the bulk of the heating into cheaper hours before pricing peaks in order to buffer heat in the heating system and the house. Depending on the price difference, that could have a large effect. Also, the obvious one, simply to not run heating when prices are high.
Tibber/Nordpool also provide me the current and next days prices so I should have a good basis on trying to perform some form of smart logic according to my thoughts mentioned above.
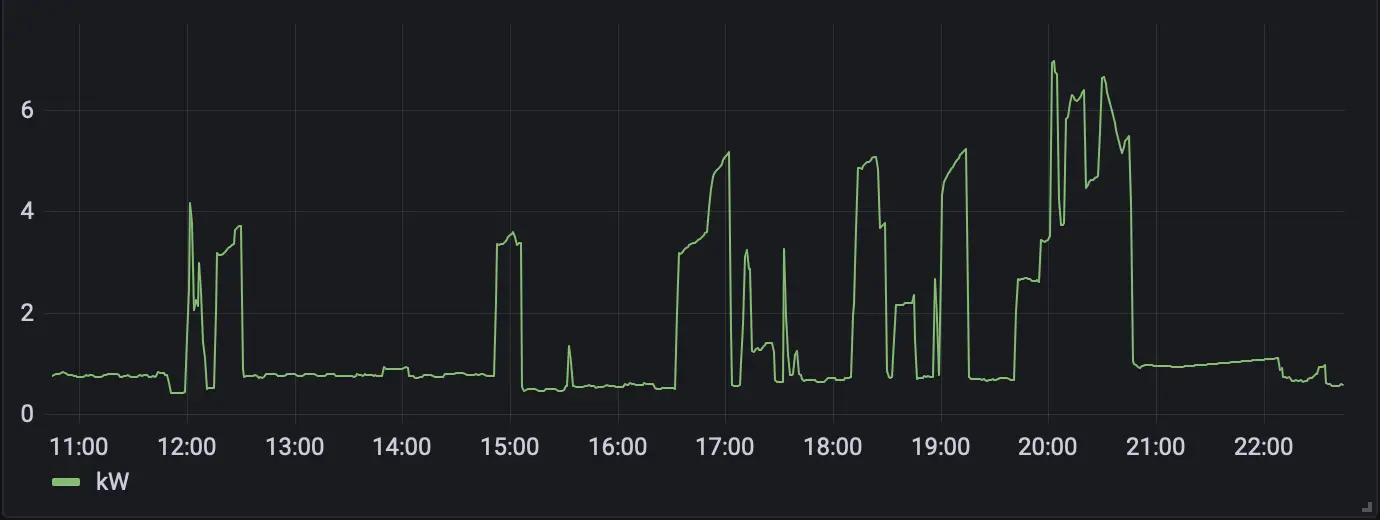
So I know that when the heat pump is running, it’s drawing somewhere about 3 to 6 kW. I know this as it’s being available using the energy company’s power switchboard which is required by law in Sweden. The peaks are mostly the heat pump starting.
I suspect that this might suffice, but another idea that can to mind was to implement some smart logic according to the Weather and outside temperature. If I can get my hands on the predicted weather forecast, then I might for example start the heating before a potential cold snap.
3. Automation
My heat pump
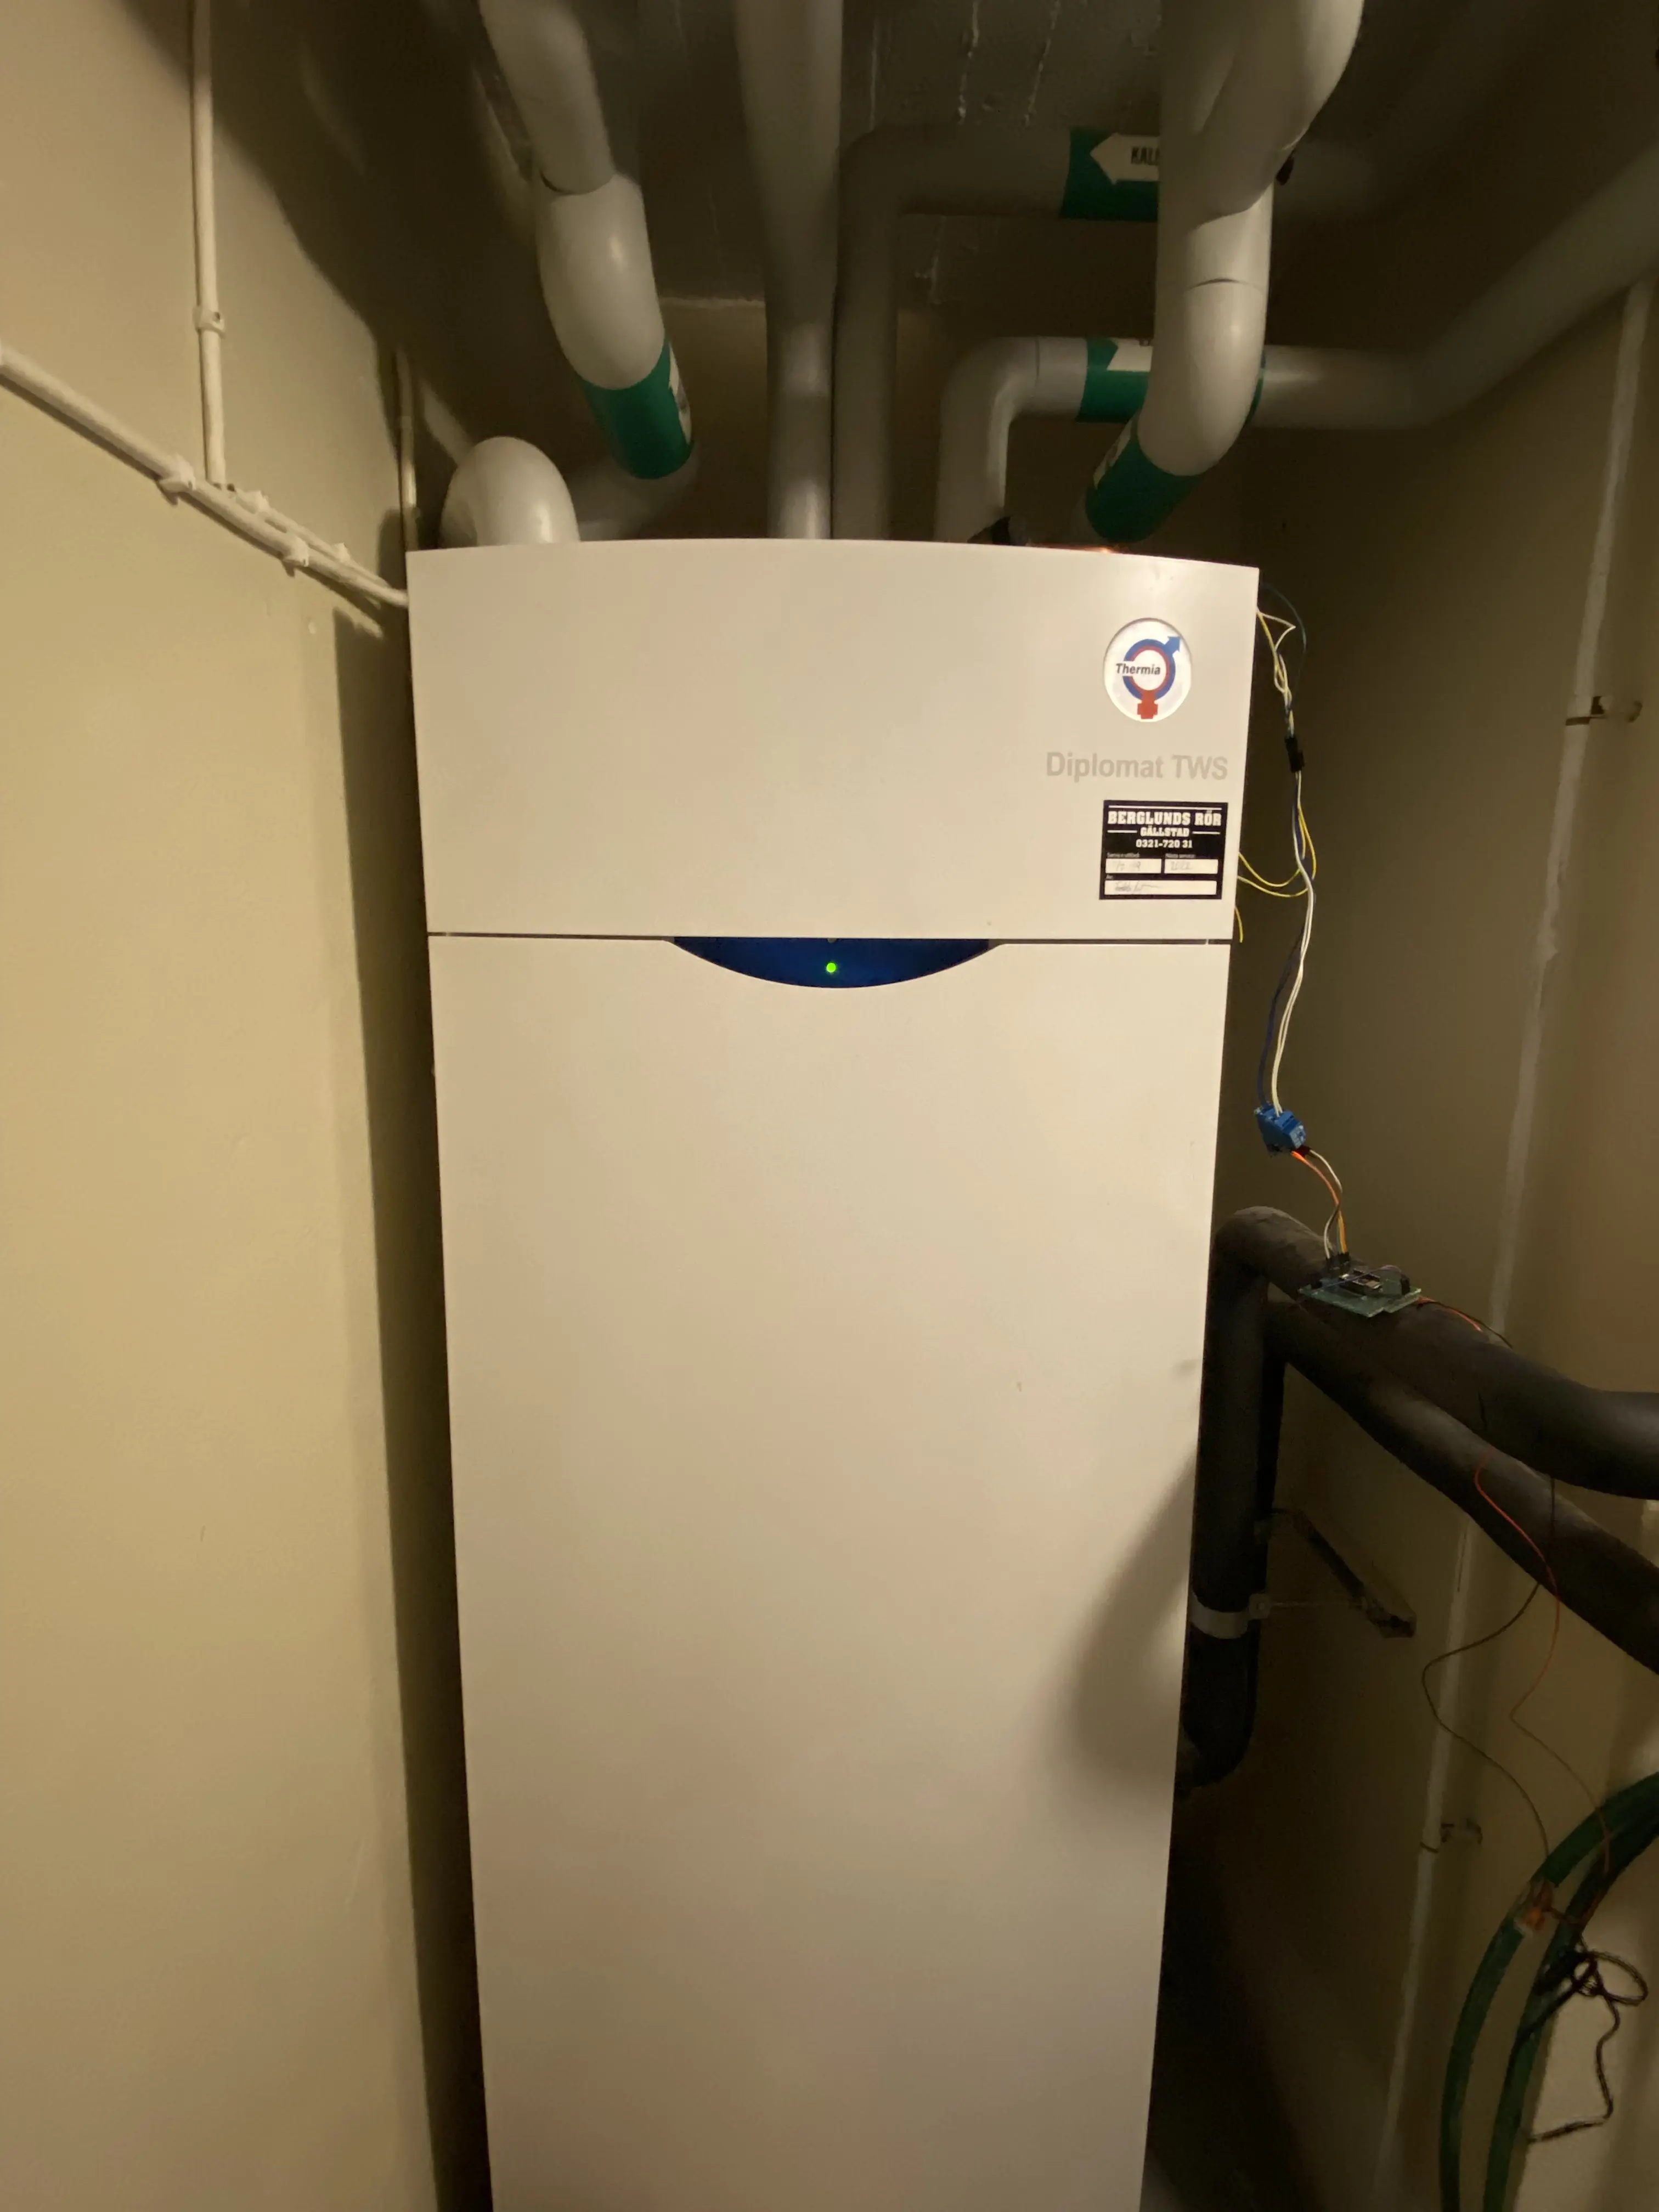
My heat pump is the ancient geothermal heat pump Thermia Diplomat TWS 10 which is responsible for heating the entire house and warm water. It’s 14 years old and starting to make weird noises, but I have high hopes to keep it going for a few more years before kicking the bucket.There is no external thermostat connected in the house (because why make it easy?) so the way to change temperature is to push the buttons on the heat pump panel.
So, how could I smartify this?
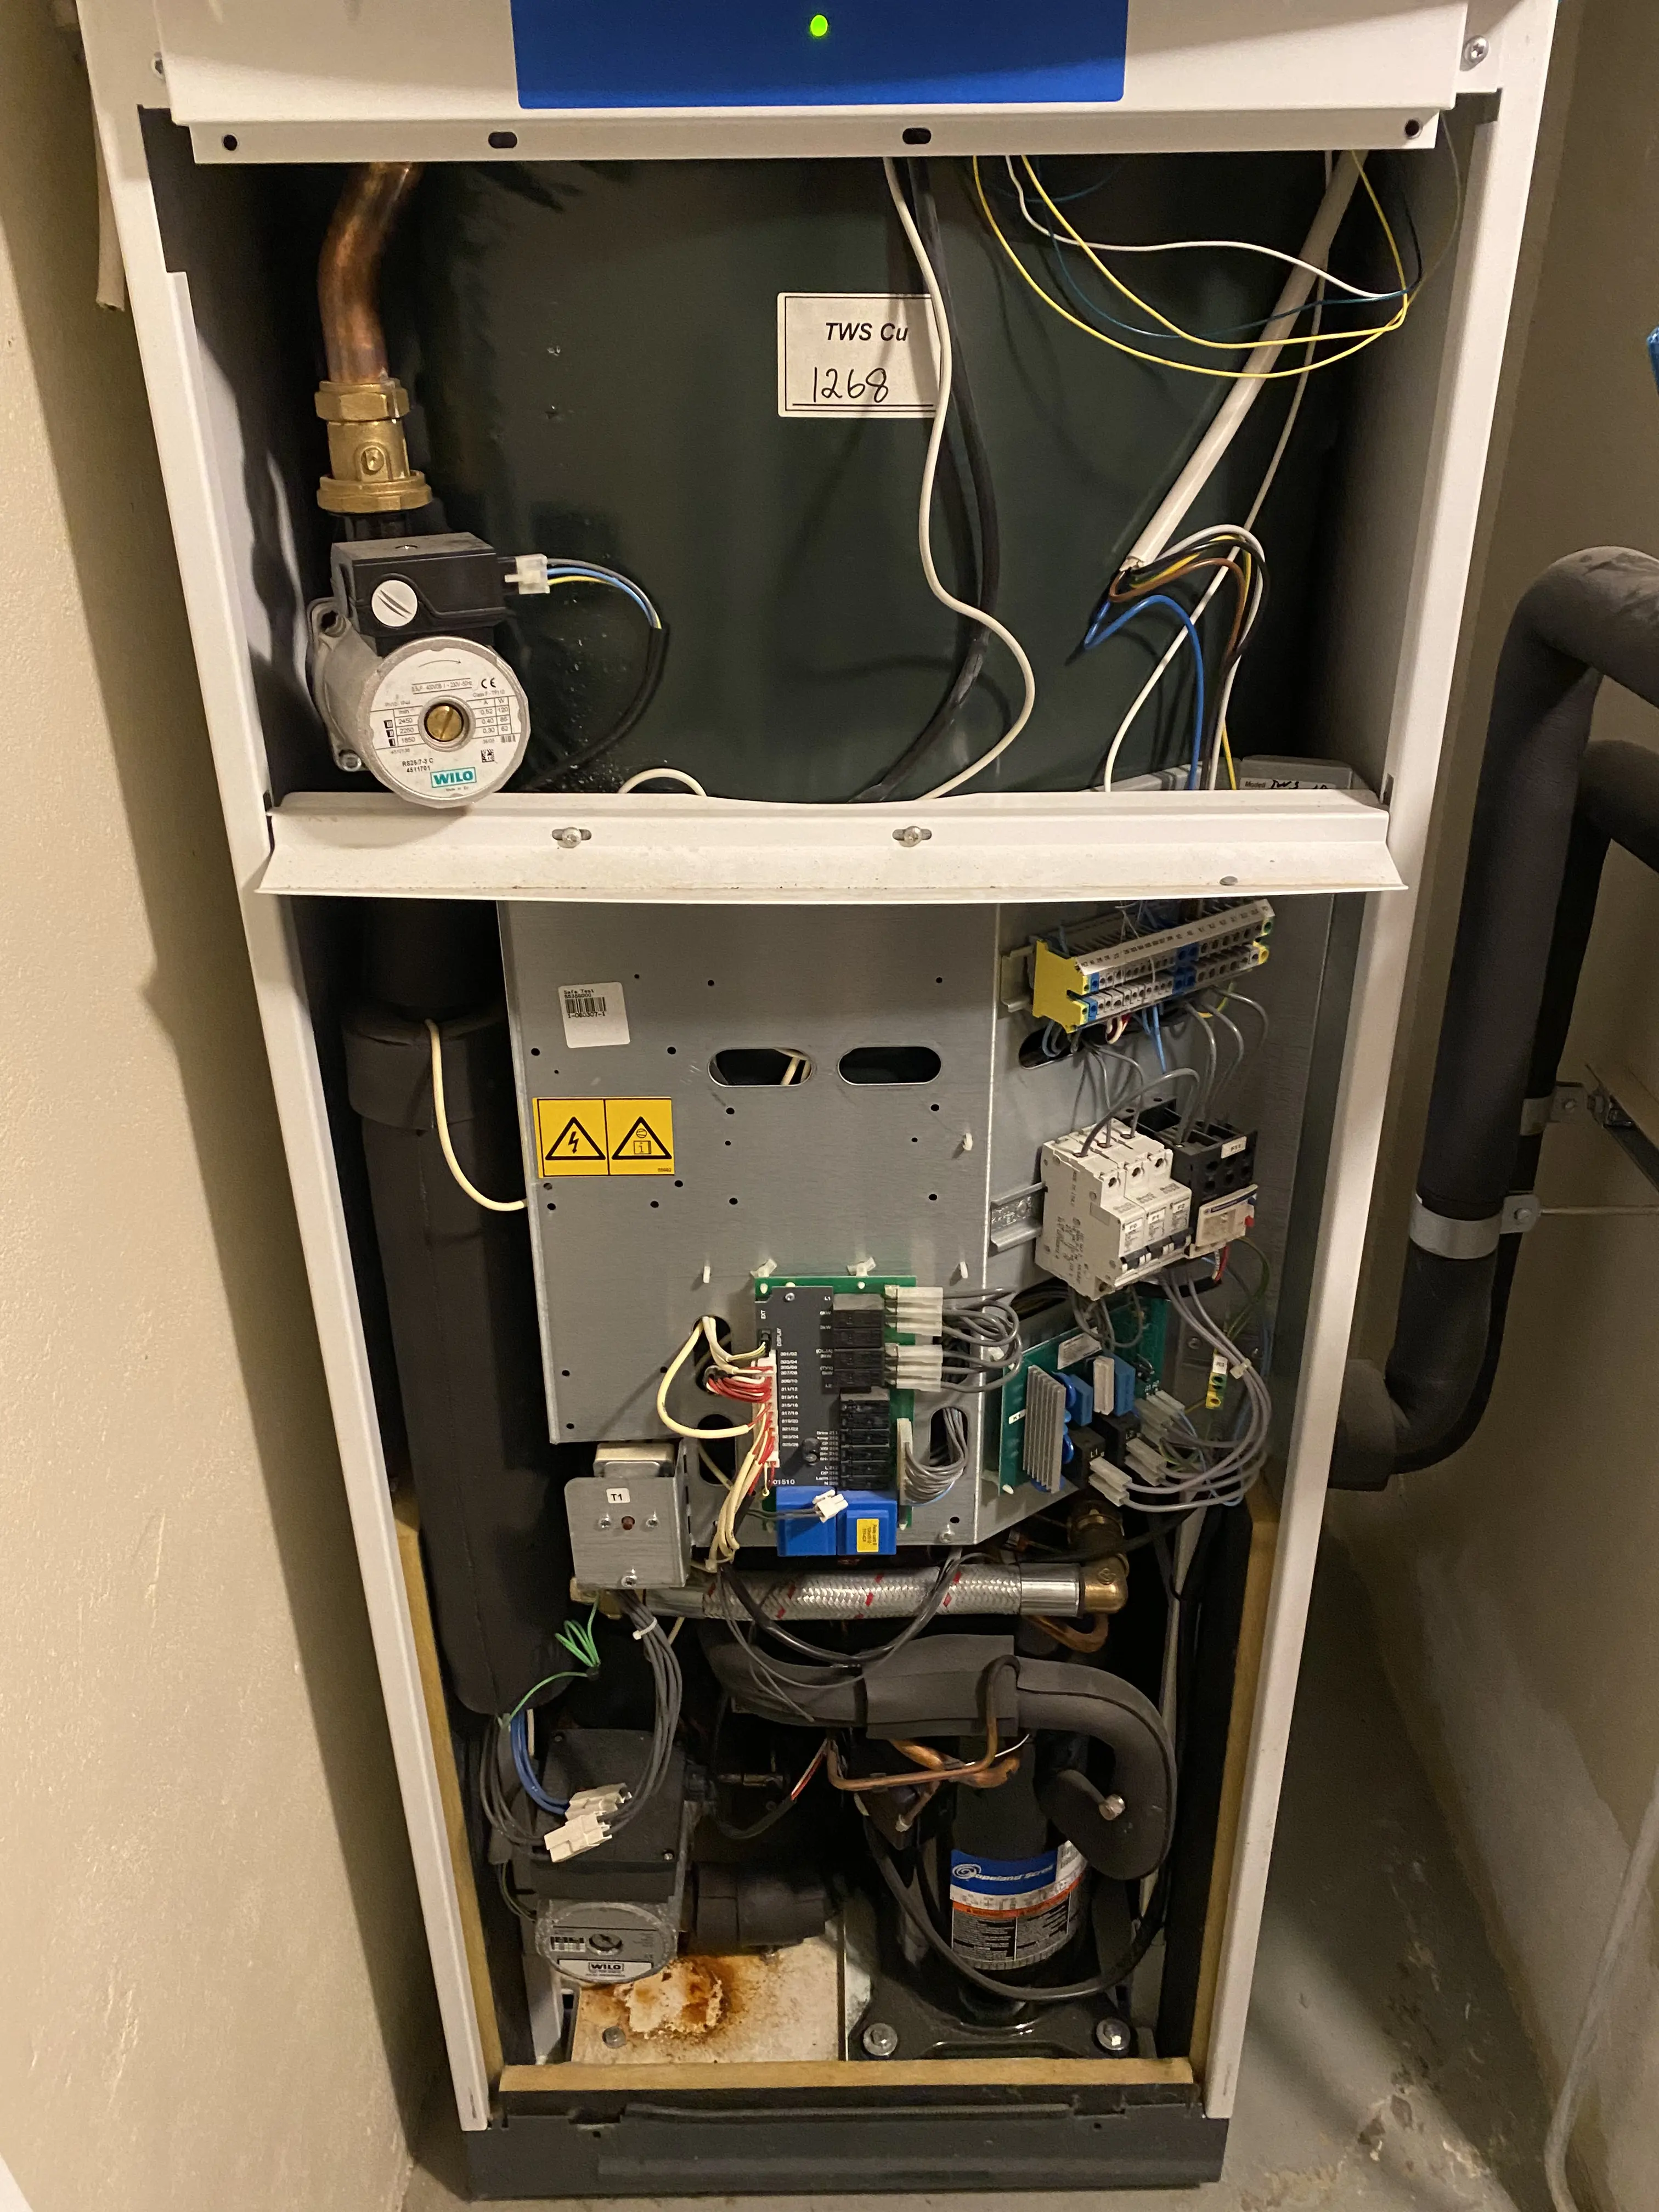
Looking at all this, nothing stands out to me in terms of standardized interfaces that I could connect to. The manual doesn’t really address is either. I honestly don’t even know what half of these things do, and I’m not too keen on finding out.

So, I started thinking, when I click a button on the heat pump panel, I noticed that there are mechanical switches that I’m clicking. I took of the display circuit board to have a closer look. What does these switches do? Do they send advanced digital signals to a signal processor to perform a bunch of logic? Not really, they really just close a circuit.
I could try to add an additional switch and closing the circuit using some other way. Perhaps a cheap WiFi enabled Arduino using normal relays?
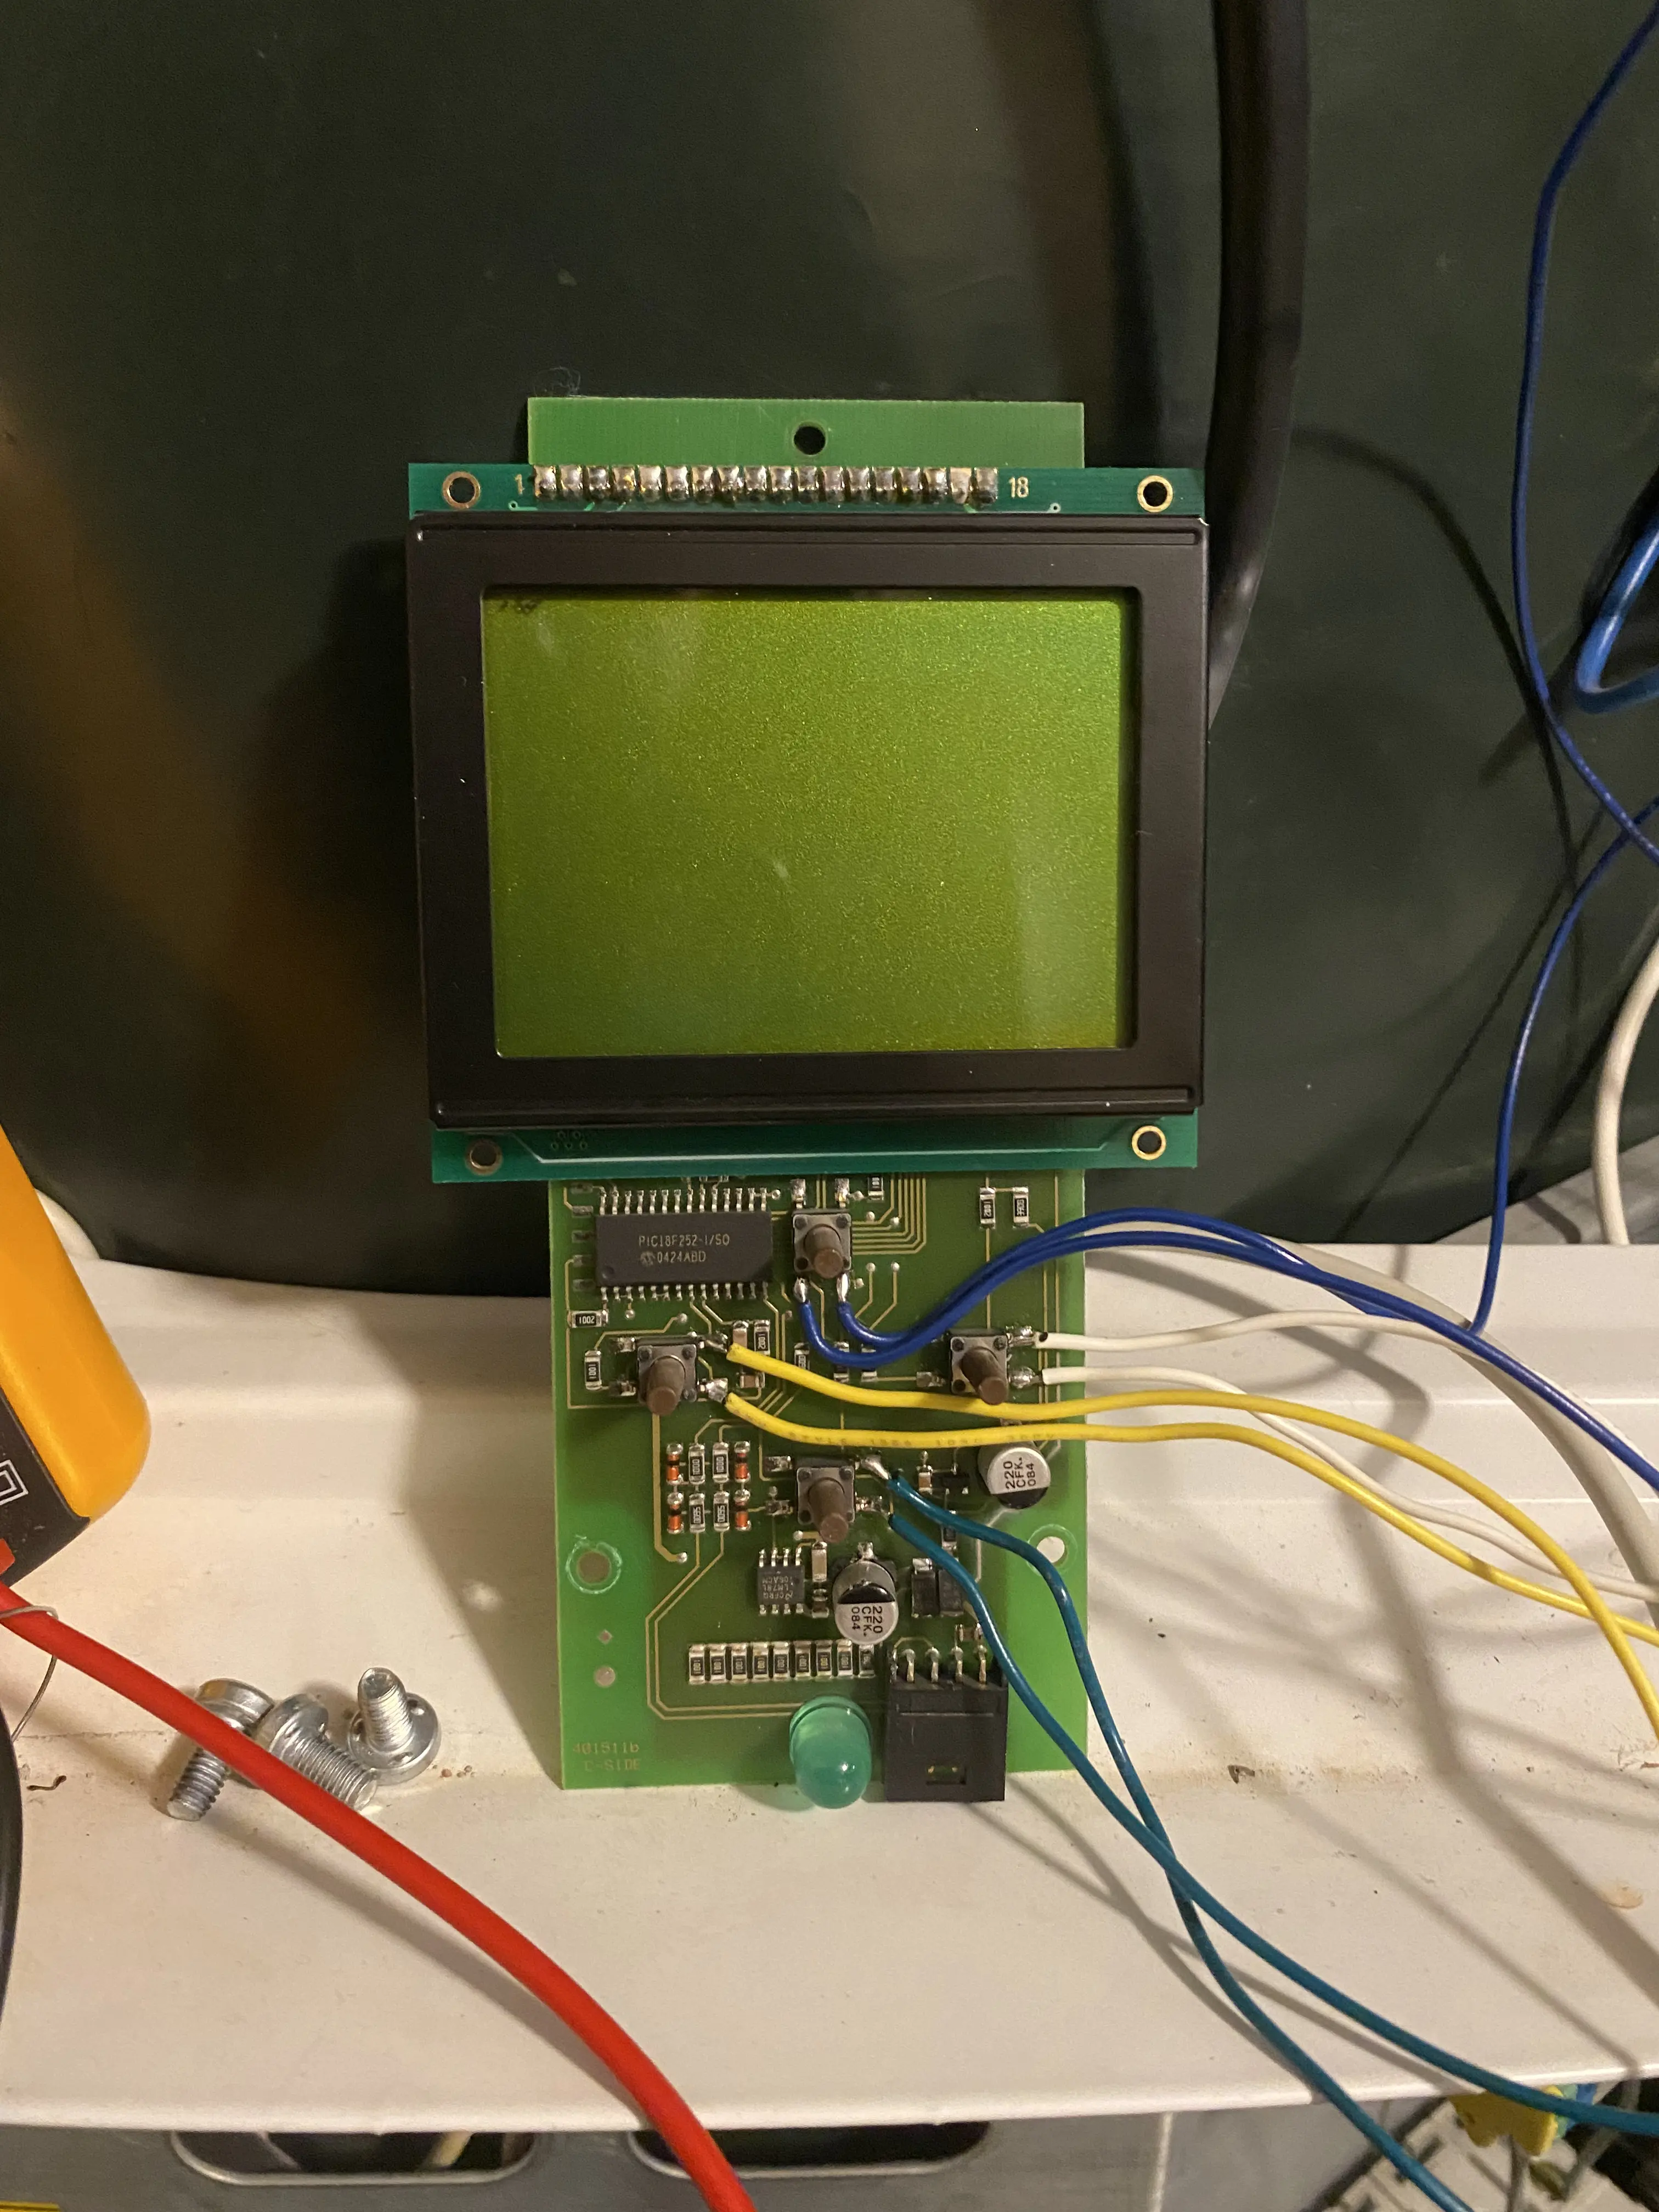
So I soldered some wires to all the buttons and terminated them with crimps and Molex Microfit connector to make connection easy outside of the heat pump.
In theory, I can now close the circuit between for example the blue cables to send an up arrow key press. I’m really only currently interested in the up and down keys but I included cabling for left and right as well while have taken the thing apart.
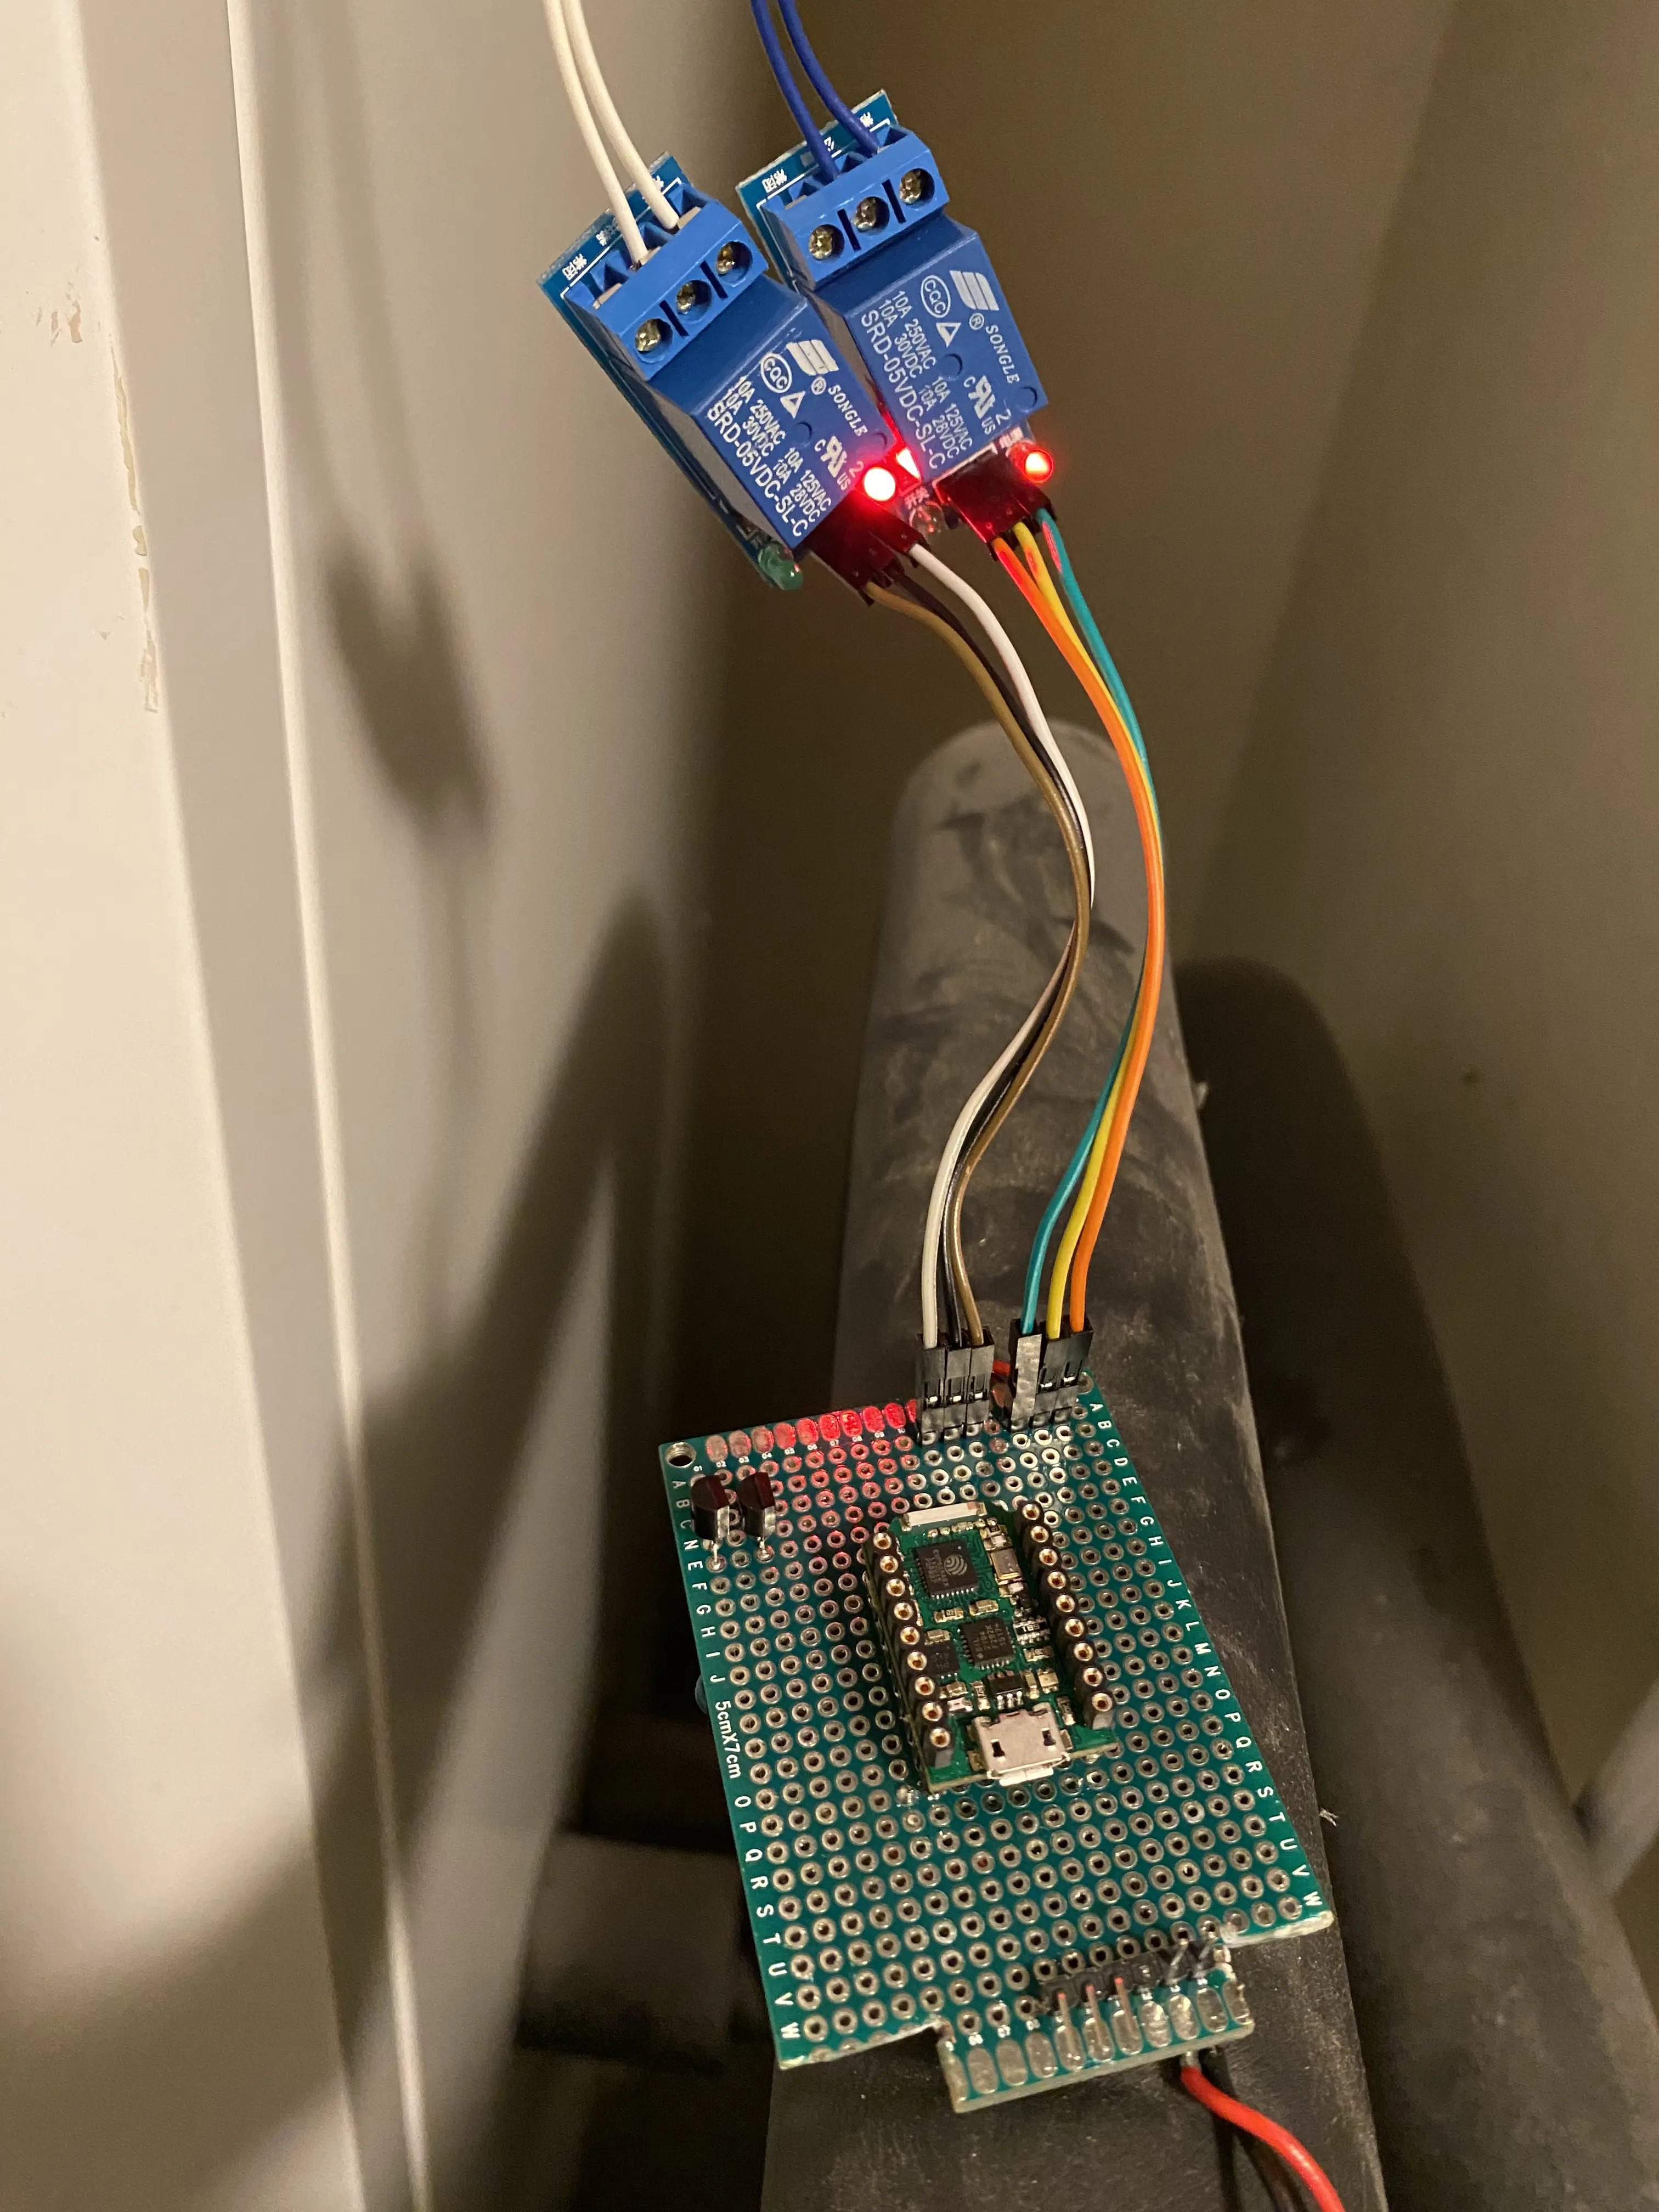
The electronics - The iLabs ESP210 & Relays
Disclaimer - all electronics will go into a neat box in the future.
I chose to use the iLabs ESP210 as my main board because of its small size and fitting all the requirements of this project. The whole circuit is powered by an external 5v 2A power supply which is a must to drive these relays. The relays I had on hand are a bit strange as the onboard transistor does not appear to do its job. So I had to use an 2n3904 NPN transistor to close the circuit to GND. I used GPIO16 (up) and GPIO15(down) as the base for the transistors.
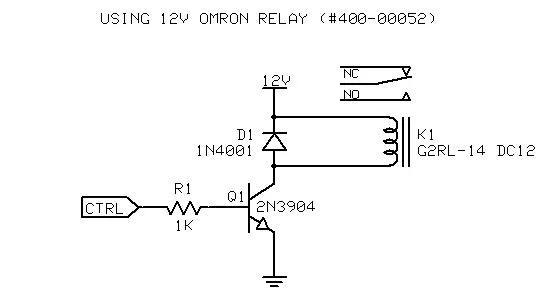
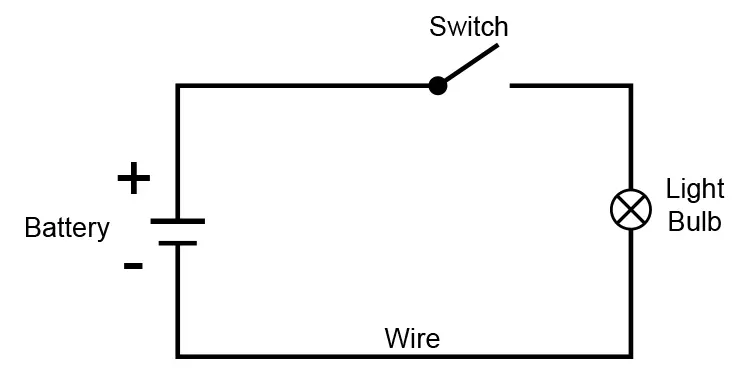
This is the schematic of the transistor triggering the relay, and should already work on the module.
Lastly, if GPIO16 signals to close the up key press, then the relay closes the connection for us like it would have if we’d press the display board mechanical switch.
Great stuff.
The software - ESPHome & Home Assistant
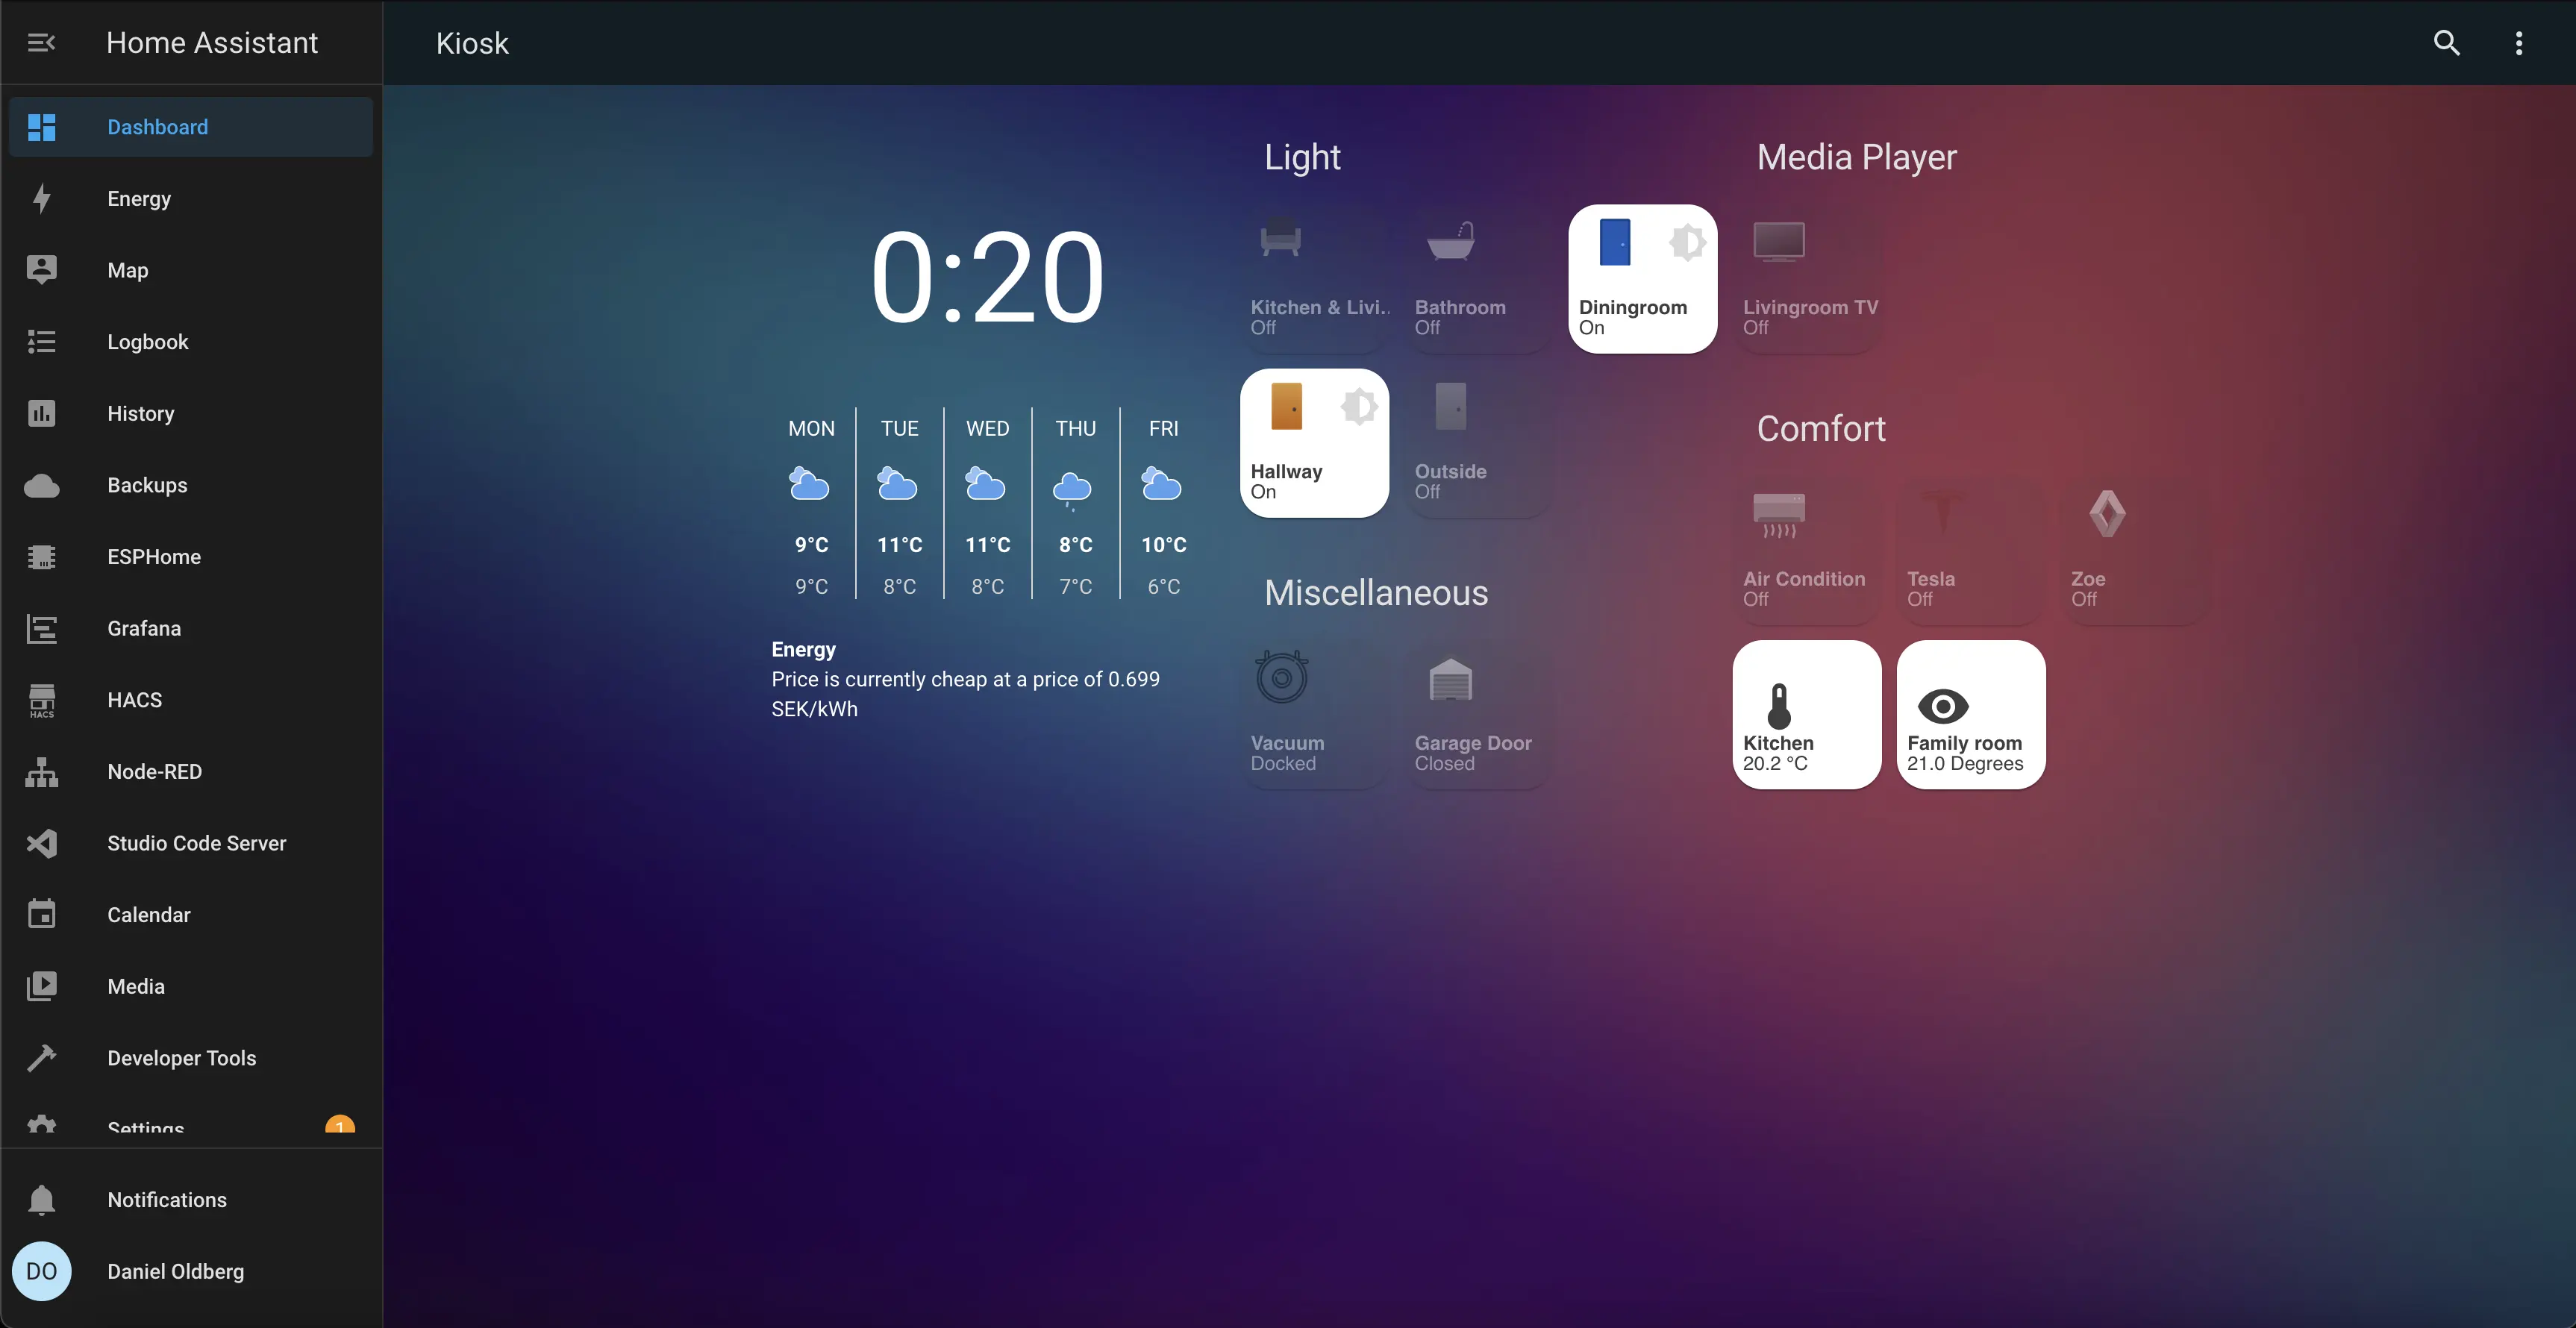
I use Home Assistant as the central hub for all smart home related tasks. This is where I aggregate all my smart devices and systems and is where I put all my automation logic using the Node-Red add-on.
My personal philosophy is that everything in my house should still operate to 100% should I lose internet connectivity. Hence, I’m very selective in the cloud services that I choose to incorporate in my home. A bit ironic since I work with cloud services in my professional life.
Home Assistant fits into this perfectly with over a thousand integrations and even more inofficial ones created by the community. From here, I can integrate lights, weather, vehicles, smart phones, and even my kitchen appliances to do all sorts of automations. It also provides a flexible frontend to be adjusted according to ones taste.
More related to the project, I also use ESPHome to easily manage and configure my ESP devices to implement simple logic without having to learn any C++ programming (although I probably should).

ESPHome makes it easy to onboard new devices by just plugging the ESP into a computer and flashing straight from the web browser. Then there’s an easy configuration file to “program” the device.
Here’s my configuration and some comments on what’s going on:
esphome:
  name: house-thermiaheatpump  # My devices name
  on_boot: # When the device is booting up run the following:
      priority: -100.0 # Wait until everything is properly initialized
      then:
        - number.set: # Set the number to 20
            id: thermia_heatpump
            value: 20


esp8266:
  board: esp210 # Define hardware board

# Enable logging
logger:

# Enable Home Assistant API
api:

ota:
  password: [redacted] # Make sure that we're able to remotely flash new firmware.

wifi:
  ssid: !secret wifi_ssid
  password: !secret wifi_password
  fast_connect: on
  manual_ip: # Set static network configuration to ensure stability
    static_ip: [redacted]
    gateway: [redacted]
    subnet: [redacted]
  use_address: [redacted]


  # Enable fallback hotspot (captive portal) in case wifi connection fails
  ap:
    ssid: [redacted]
    password: [redacted]

number:
  # Internal number used to represent actual heatpump number
  - platform: template
    id: "heatpump_actualtemperature"
    min_value: 10 # The lowest temperature the heat pump will go
    max_value: 30 # The highest temperature the heat pump will go
    optimistic: true
    step: 1

  - platform: template
    name: "Thermia Heatpump"
    id: "thermia_heatpump"
    min_value: 10
    max_value: 30
    optimistic: true
    step: 1
    set_action: # When the number is changed internally or by Home Assistant, do the following
        then:
          - switch.turn_on: thermia_down # Hold down to go to minimum, i.e. 10
          - delay: 10s # Wait 10 seconds
          - switch.turn_off: thermia_down # Let go of "the button"
          - delay: 1s
          - while: # While condition is true
              condition:
                lambda: 'return x != id(heatpump_actualtemperature).state;' # While x (the number that represents the change) is different than the actual state on the heat pump
              then:
              - logger.log:
                  format: "Requested temparture is %.1f against existing %.1f. Performing %.1f increments."
                  args: [ 'x', 'id(heatpump_actualtemperature).state', 'abs(x - id(heatpump_actualtemperature).state)' ]
              - lambda: |-
                    id(thermia_up).turn_on(); # "Press the up key"
              - delay: 1s
              - lambda: |-
                    id(thermia_up).turn_off(); "Release the up key"
                    auto call = id(heatpump_actualtemperature).make_call();
                    call.number_increment(true); # Increment the internal variable to properly represent the value on the heat pump
                    call.perform();
              - delay: 1s

# Configuration section to setup the "buttons"
switch:
  - platform: gpio
    name: "thermia_up"
    id: "thermia_up"
    pin:
      number: GPIO16
      #inverted: true
    restore_mode: ALWAYS_OFF
  - platform: gpio
    id: "thermia_right" # Not used
    pin:
      number: GPIO14
      #inverted: true
    restore_mode: ALWAYS_OFF
  - platform: gpio
    id: "thermia_down"
    name: "thermia_down"
    pin:
      number: GPIO15
      #inverted: true
    restore_mode: ALWAYS_OFF
  - platform: gpio
    id: "thermia_left" # Not used
    pin:
      number: GPIO13
      #inverted: true
    restore_mode: ALWAYS_OFF
You might ask yourself - Why does he need to go down to the minimum before stepping up to the requested value?
I did a lot of testing and one issue I encountered was that might relays were “double-tapping”, or in other words, micro-bouncing in rare cases which would throw my degrees of by 1 in some instances. This would not at all be acceptable as over time this could drift in any direction when allowing to step up and down. I should invest in better(quicker) relays but as of now, I’ll be doing a reset each time to make sure that I’m no more than +/- 1 degrees off.
Next up, how can pricing data be used to control the heat pump?
To be continued.